Saturday, July 23, 2016

DIY- Jar Pincusion


What's better than a pincushion?  A pincushion that also holds other sewing or crafting necessities, that's what!

For this project, you'll need:


  1. Any kind of glass jar.  I used a baby formula container in this example.
  2. Ribbon
  3. A square of fabric, the size depending on how big the lid of the container is.  My jar's top was 1 1/2 inches and I used a 4 x 4 piece.  If I were to use a mason jar, I would probably use an 8 x 8 square.
  4. Needle and thread
  5. A small amount of wool stuffing. (The wool is supposed to keep the pins sharp, but if this is more for decoration, like mine, use whatever you have, like polyfil or yarn scraps.)
  6. A sharp knife or scissors
Preparation:
Before you begin this project, run your glass jar under warm to hot water and use steel wool to get the label off.  If you don't have any steel wool, I recommend you run it through the dishwasher or soak it in hot water, then use a sponge or your hands to get the label off. (Unless you would like to leave the label on the jar, then by all means leave it on)

Step 1:

Cut out a square of fabric, the size depending on the diameter of the jar lid.  For this 1 1/2 inch lid, I used a 4 x 4 square.


Step 2:

Use a needle and thread to stitch along the edges of the entire square.  Make sure that you keep the stitches wide, you'll see why pretty soon.  Don't worry about matching the colors of the thread with the fabric either; nobody is going to see this stitch.  Once Finished, do not cut off the excess thread.


Step 3:

Once you have completed step 2, pull the rest of the thread so the fabric begins to form a sack.  Stuff this sack  to your heart's content.  The more stuffing that goes in, the better the pincushion holds it's shape when it's used.  To get the maximum possible amount of stuffing in there, tighten the thread a little bit more every time you feel that the sack is full, then continue stuffing.  Stop when you feel like you've stuffed enough, and tighten the thread as much as it will go, then fasten off.


My little puppy decided she wanted to help me stuff and brought me some yarn, which she ever so thoughtfully unraveled herself!


Step 4:

Take the lid of the jar, and a sharp knife, and cut out a medium-sized hole in the lid for the pincushion to pass through.  Place the pincushion under the lid, and pull it through until it looks pretty.  Screw the lid back onto the jar.


Step 5: (Optional)

Take some ribbon and wrap it around the lid once, then glue it in place.  Follow the directions which can be found here to create a small bow with the same ribbon.  Glue the bow over the joining spot on the ribbon.


Once you're finished, fill your jar with whatever you want and stick some pins in the top!

Friday, July 1, 2016

DIY- Tree Silhouette


In my bedroom, I want to exhibit my personality in every aspect possible.  What's the best way to do that?  Paint a wall mural.  This tutorial will explain to you the steps I took to paint the tree silhouette behind my bed, shown above.

Materials:


  1. 1-2 8oz samples of wall paint in black, white, or whatever color you would like to use for the mural (amount depending on size of mural, I used only one)
  2. Paint brushes, one large and one small
  3. Pencil
  4. Notebook
  5. Ruler and measuring tape
  6. Painter's Tape
  7. Not more than a week of time

Step 1:

Before you even consider beginning on your mural, pick a spot where you would like it to go.  I highly recommend drawing a sketch of what you want to paint.  This will help you collect your thoughts on paper, and mistakes are easy to correct.  


Step 2:

Once you have your sketch done, take measurements of the wall area and divide the section of wall into an imaginary grid.  To do this, draw a line at the bottom where you want the floor to be, and use a ruler to create lines at half-inch intervals along the image.  As you can see in the example above, I labeled the vertical sections with numbers.  Next, take a measuring tape and get a measurement of the length of the section of wall you will be painting on.  Take that number in inches and divide it by the number of sections you have divided on paper.  The number you have will be the length, in inches, On the wall.  For example, a section of wall is 3'9" 1/2.  In inches, this is 45 1/2.  Dividing this number by my 15 sections, I came up with about 3 1/4 inches per section.  I didn't use horizontal sections, but if you are inexperienced with painting or just think you suck at size perception, I recommend using them, the process is the same, but you'll be measuring the height of the wall, from the floor to the ceiling.

Step 3:

Take some painter's tape and line it along the floor (or baseboard) where you want the mural to go.  Using the measurements you came up with in step 2, use your ruler to draw a tick at the border of every section on the tape.  Again, I labeled these sections with their corresponding numbers.  Do NOT draw lines on the wall.

Step 4:

Using the grid on the paper and the wall, use a pencil to draw the outline of your design on the wall.  Keep in mind that the image on the wall will not be like the one on the paper.  On my mural, I added branches and birds.

Step 5:

Once satisfied with the pencil design, paint the mural.  Paint small sections at a time and make sure each section gets at least two coats of paint.  (Tip: paint from the top to the bottom)  Make sure you don't overwork yourself and take frequent breaks to hydrate yourself, this process will take several days, depending on your schedule.

Step 6:

Now that you've finished the mural, It's time to make some touch-ups.  Erase stray pencil marks and if you have any, use the background wall paint to touch up any drips or smudge lines.

Congratulations! You've finished your mural!  Make sure to show it off to everyone who comes to visit.

Thursday, June 16, 2016

Father's Day- DIY Barbecue Tool Hanger


Father's day is quickly approaching, and finding something creative to give Dad can be a real hassle.  Dads all over the world are getting shirts, socks, and underwear, and while useful, clothes are not an exciting gift to receive.  This year, I made my father a personalized gift that I know he will love, and for under $20!

For this project, you will need:

  1. Fence Posts or Wooden Stakes
  2. Towel Hangers
  3. Lots of Screws
  4. Paint
  5. Some way to connect the boards
  6. Sandpaper 
  7. About 4 hours of time 


To start, I took a trip to the local Home Depot and found myself a bundle of six 2" x 2" stakes and six towel hangers.  When I got home, I sanded the stakes and painted them white, then laid them out to dry for a couple of hours.


Once they were dry, I laid them out side by side to determine how the shape of the hanger would be.  I sanded the outside edges further, to ensure there would be no chance of anyone getting a splinter.


Now was the tricky part; how can I connect these boards to each other?  I first found some long nails and tried to nail them together, but it was taking way too long, so I searched the garage for another solution.  Eventually I found this copper tape stuff with holes in it, and laid it out across the stakes.  I screwed it onto each of the boards on the bottom area, then repeated on the top.


Once that was done, I cut a little strip and screwed it on top of the top tape so that it can be hung on the wall.


As you can see, some of the screws have washers, and some don't.  This is due to the fact that some of the holes were too big for the screw heads to hold down.  Depending on the size of the holes in your tape, this may or may not also be necessary.

Next, I proceeded to write "King of the Grill" on the top half of the front in pencil.


Then I pained in the words with black, and sanded the whole front to make it look more aged.


I finished the project by screwing the hangers onto the boards, and sanded the edges some more, to ensure maximum smoothness.


Once you finish, wrap up your present and you can be sure to surprise your dad on father's day!

Tuesday, June 7, 2016

Crochet- Slouchy Beanie Hat


Prepare to stay warm and cozy by making this cute slouchy beanie hat!  The pattern is simple, and doesn't take too much time to make.

To begin, you're going to need:
  1. One skein of yarn for each color you want to use
  2. Size I crochet hook
  3. About a week of time

To make the ribbed edge:

Ch. 20
Row 1: sc in second ch from hook, sc across
Row 2: ch 1, turn, sc in back loop of each sc across
Row 3-?: Repeat Row 2 until the band fits comfortably around your head
Finish: whipstitch the first row to the last row, tie in ends

To make the hat:
Row 1: take your contrast color and ch. 3 where you whipstitched the band together.  2 DC in each stitch around.  sl st in first st of the round
Row 2-3: ch. 3, DC in each DC around; sl st in first st of the round
Row 4: Without cutting the contrast color*, change to the original color and ch. 2.  HDC in each DC around; sl st in first st of the round
Row 5: chg back to contrast color and repeat rows 2-4 once, without changing colors in between 
Row 8: chg to original color and repeat row 2 once
Row 9: chg to contrast color and repeat rows 2-3 once
Row 11: chg to original color and repeat row 2, then repeat row 4
Row 13: chg to contrast color and repeat row 11
Row 15: chg to original color and repeat row 2-3
Row 17:chg to contrast color and repeat row 2
Row 18-?: chg to original color and repeat row 2-3 until satisfied with the length and level of slouchy-ness
Fold your hat in half and tie the top together at the center; fold in half the other way and tie the edges so the top view of the hat looks like an X.  Secure tightly
Tie in ends and flip hat right side out
*never cut the yarn when changing the colors for this hat, just allow the yarn to run up the side of the work as you change colors.  However, make sure the running yarn remains on the same side of the hat as you intend to be the inside.  This makes finishing easier, and saves a lot of time and yarn.  

Monday, May 30, 2016

DIY- Wreath


Memorial day is here, and I don't care what the calendar says, it's officially summer!  To celebrate, I have made a new wreath to decorate the door for the coming months.  Made out of actual sticks.  Yes, actual sticks I got from actual trees.  I find that they smell better than the plastic ones you can find at craft stores, and definitely make the wreath look more appealing too.


Things you will need:
Floral Wire
Sticks (15-20)
Flowers & Butterflies
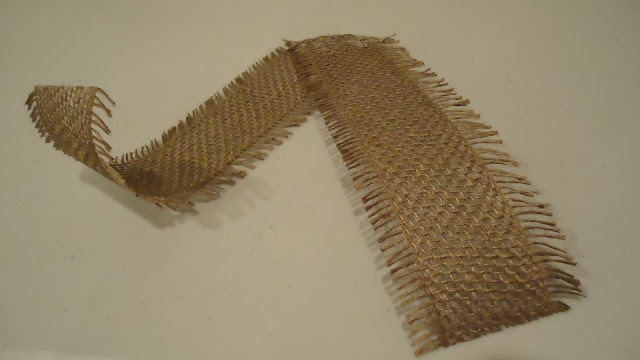
Burlap Ribbon (Tutorial can be found here)
Scissors
Rustic Wooden Letter
Hot Glue

To start off, I went to the trail behind my house and gathered a bunch of sticks, I didn't get a picture, but I tried to get ones that were about 3 feet long and no more than 2 cm in diameter.  I took them home to the backyard and inspected each one for bugs and washed them all down with a high setting on the hose.  

Depending on how much rain you have been getting, you can skip the next step, but I recommend it anyway:  In order to make the sticks more flexible, you're going to want to soak them in a warm to hot bath for a few hours, or overnight.  

Once they were bendable, I followed this tutorial for making the actual wreath.  Basically, I just made a ring out of one of the sticks and tied it off with some floral wire, then kept wrapping more sticks around it until I was satisfied with the thickness.  At one point, I ran out of sticks that were long enough or thick enough to wrap around, so I began tying the smaller ones into the wreath with the floral wire.

After I had fussed with the wreath to my liking, I began to cut the flowers from their bushels and used hot glue to attach the stem to a strip of floral wire, which made it easier to tie them in.  I also found some cute little butterflies at the Dollar Tree so I put those in too.


At this point, you can leave the wreath like it is, but I thought it would be cool to personalize it with an "M" for my name.  I used hot glue to attach a strip of wire to the back of the letter, and also a burlap bow.


I tied them to the wreath and was happy to be done with my new decoration!


Monday, May 23, 2016

DIY- Paper Rose Vase


I'm a procrastinator.  I always wait until the very last minute to do things, and when my friend's birthday party rolled around, I waited until the night before to even think about what I would do for a present.  So I hit up the nearest Walmart for some inspiration and was struck by an idea.  Why buy a present when I can make one?  So I filled my cart with some chocolates, burlap ribbon, and this cute vase that says, "Live, Laugh, Love" on it.  Once home, I busted out my glue gun and got to work.


Supplies:
  1. Hot glue gun
  2. Hot glue sticks
  3. Burlap Ribbon
  4. Glass Vase
  5. Chocolate
  6. Sheet Music/ Book Pages
  7. Scissors
  8. Wire
  9. Brown yarn


I started off by preparing the vase itself.  To make the burlap bow, I cut 3 strips of ribbon, each different sizes: 5, 11, and 17 inches.  


I then proceeded to form a circle with the medium length strip, using some hot glue to keep it in place.


I then took the long piece and folded it in half, then spread out the bottoms and used glue to secure the fold.  At this point, you can cut little V's at the base of the ribbon to make it seem more clean.


After that, I flattened the round piece and stuck it to the folded piece, securing with hot glue.  I then folded the small piece in half lengthwise and wrapped it around the two in the middle, securing with more hot glue in the back to finish the ribbon.  I then glued the whole thing to the vase, careful not to cover the words.


Once that was done, I began to print out my friend's favorite songs ("Hysteria" by Def Leppard and "Kickstart My Heart" by the Motley Crue), and pages from her favorite book, Gone With the Wind.


To give them an aged look, I took some leftover coffee from the pot and poured it into a rimmed baking sheet.  I then dipped the pages in there and let them sit for about 10 to 20 minutes as I preheated the oven to 350 degrees.


After they had been sitting in the coffee, I took them out and moved them to another pan, which I then put into the oven for about 5-10 minutes, until the paper was completely dry.  I repeated this process until all the papers had a nice aged look to them.


To make the roses, I began by cutting the paper into sets of three squares in two sizes, 3x3in and 5x5in.  I tried to make at least one large square for each song and book, to add some variety.


I then folded the squares in half and in half again, to form smaller squares.


Then I folded the squares into triangles, making sure one of the corners contained only folded sections, and drew a flower petal in pencil as an outline.  Make sure to draw a line at the base of the triangle, so that there will be a hole at the center of the flower.


Once I cut and unfolded the triangles, I ended up with this:


I then cut one petal out of one flower, two out of another flower, and three out of the last flower.


I used the hot glue to glue the all the pieces with three or more petals together, and ended up with this:


Then I rolled the tips of each petal backwards, to give a more natural appearance:


After that, I rolled the one petal piece into a cylinder and glued it into the two petal piece, which I rolled into a cone.  I glued that ensemble into the three petal piece, then the four peal piece, and so on until I had all the pieces glued together.


I repeated these steps for the rest of the flowers, and glued 13" strips of wire into the bottom for the stem.


I then got some brown yarn and wrapped it around the stems until the wire was fully concealed, and used glue to secure it in place.


I collected the roses into a bouquet and tied them together to keep them securely in place.  I then placed them in the vase and filled it with the chocolates to finish off.  


I love how these roses look so real, yet they smell like coffee.  Where can you get roses that smell like coffee?  Certainly not at the store.  Needless to say, it's always better to give a gift that's sentimental to a person that to just get a gift card to Starbucks.

Tuesday, May 17, 2016

Crochet- Basket-weave Pillow


Continuing with the theme of my last post, I have made another crochet pillow.  With it's simple yet appealing basket-weave appearance, this pillow is perfect as a throw pillow for couches, benches, and beds.  This pillow is about 12'' by 12''.

For this pillow, I made one side with the basketweave pattern and the other side with just plain single crochet, but this pillow can also be made with both sides having the basketweave pattern.

Moving on to the pattern, to make this pillow you will need:


  1. Stuffing (I used polyester fiber-fill)
  2. A size I (5.5mm) crochet hook
  3. Yarn needle
  4. One ball of yarn
  5. About 2-3 weeks of time

Basketweave side:
Row 1: ch. 45
Row 2: Dc in 3rd ch from hook, dc across, ch 2, turn.
Row 3: Skipping the first dc, FPDC in next 3 Dc, *BPDC in next 4 dc, FPDC in next 4 dc* repeat from * to * across, ch 2, turn
Row 4: Skipping the first dc, BPDC in next 3 dc.  *FPDC in next 4 dc, BPDC in next 4 dc* repeat from * to * across, ch 2, turn
Row 5: Skipping the first dc, BPDC in next 3 dc.  *FPDC in next 4 dc, BPDC in next 4 dc* repeaat from * to * across, ch 2, turn
Row 6:  Skipping the first dc, FPDC in next 3 Dc, *BPDC in next 4 dc, FPDC in next 4 dc* repeat from * to * across, ch 2, turn
Row 7-end: repeat from row 3-6 until the length is about the same as the width (an easy way to test this is to fold it diagonally periodically until it forms a triangle)

Single crochet side: (If you want another basketweave side, repeat the above)
Row 1: ch. 45
Row 2: sc in each ch across, ch 1, turn
Row 3: sc in each sc across, ch 1, turn
Row 4-end: Repeat row 3 until the length is about the same as the basketweave side

Once both sides of the pillow are done, place them together, wrong sides facing out, and whipstitch them together for 3 of the sides.  Flip the pillow inside out and commence stuffing it to your liking. Once stuffed to a good amount, whipstitch the final edge together to close it off.  Tie off, weave in the ends, and you're done!

Here's a key for the abbreviations:

FPDC: Front Post Double Crochet
BPDC: Back Post Double Crochet
Dc: Double Crochet
Sc: Single Crochet
Ch: Chain

Monday, May 9, 2016

Crochet- Chevron Pillow


So I have decided to step away from the old and overused tradition of making crochet scarves and afghans and move on to pillows!  Just recently I have had an urge to flood my bedroom with throw pillows, and decided to start with this simple pattern from Red Heart.  This was a very easy and repetitive pattern, which is perfect for beginners.  The link to the pattern can be found here.  The pillow is about 30.5 x 40.5 cm, and is decorated with a modern chevron pattern.


To make this pillow, you'll need:

  1. Your favorite stuffing (I used polyester fiber-fill)
  2. Two balls of yarn, one for each color you want to use
  3. A size I (5.5mm) crochet hook
  4. About 2-3 weeks of time

I am very happy with the end result, and I love the idea that I can make the colors whatever I want to match my room scheme.