Monday, May 30, 2016

DIY- Wreath


Memorial day is here, and I don't care what the calendar says, it's officially summer!  To celebrate, I have made a new wreath to decorate the door for the coming months.  Made out of actual sticks.  Yes, actual sticks I got from actual trees.  I find that they smell better than the plastic ones you can find at craft stores, and definitely make the wreath look more appealing too.


Things you will need:
Floral Wire
Sticks (15-20)
Flowers & Butterflies
Burlap Ribbon (Tutorial can be found here)
Scissors
Rustic Wooden Letter
Hot Glue

To start off, I went to the trail behind my house and gathered a bunch of sticks, I didn't get a picture, but I tried to get ones that were about 3 feet long and no more than 2 cm in diameter.  I took them home to the backyard and inspected each one for bugs and washed them all down with a high setting on the hose.  

Depending on how much rain you have been getting, you can skip the next step, but I recommend it anyway:  In order to make the sticks more flexible, you're going to want to soak them in a warm to hot bath for a few hours, or overnight.  

Once they were bendable, I followed this tutorial for making the actual wreath.  Basically, I just made a ring out of one of the sticks and tied it off with some floral wire, then kept wrapping more sticks around it until I was satisfied with the thickness.  At one point, I ran out of sticks that were long enough or thick enough to wrap around, so I began tying the smaller ones into the wreath with the floral wire.

After I had fussed with the wreath to my liking, I began to cut the flowers from their bushels and used hot glue to attach the stem to a strip of floral wire, which made it easier to tie them in.  I also found some cute little butterflies at the Dollar Tree so I put those in too.


At this point, you can leave the wreath like it is, but I thought it would be cool to personalize it with an "M" for my name.  I used hot glue to attach a strip of wire to the back of the letter, and also a burlap bow.


I tied them to the wreath and was happy to be done with my new decoration!


Monday, May 23, 2016

DIY- Paper Rose Vase


I'm a procrastinator.  I always wait until the very last minute to do things, and when my friend's birthday party rolled around, I waited until the night before to even think about what I would do for a present.  So I hit up the nearest Walmart for some inspiration and was struck by an idea.  Why buy a present when I can make one?  So I filled my cart with some chocolates, burlap ribbon, and this cute vase that says, "Live, Laugh, Love" on it.  Once home, I busted out my glue gun and got to work.


Supplies:
  1. Hot glue gun
  2. Hot glue sticks
  3. Burlap Ribbon
  4. Glass Vase
  5. Chocolate
  6. Sheet Music/ Book Pages
  7. Scissors
  8. Wire
  9. Brown yarn


I started off by preparing the vase itself.  To make the burlap bow, I cut 3 strips of ribbon, each different sizes: 5, 11, and 17 inches.  


I then proceeded to form a circle with the medium length strip, using some hot glue to keep it in place.


I then took the long piece and folded it in half, then spread out the bottoms and used glue to secure the fold.  At this point, you can cut little V's at the base of the ribbon to make it seem more clean.


After that, I flattened the round piece and stuck it to the folded piece, securing with hot glue.  I then folded the small piece in half lengthwise and wrapped it around the two in the middle, securing with more hot glue in the back to finish the ribbon.  I then glued the whole thing to the vase, careful not to cover the words.


Once that was done, I began to print out my friend's favorite songs ("Hysteria" by Def Leppard and "Kickstart My Heart" by the Motley Crue), and pages from her favorite book, Gone With the Wind.


To give them an aged look, I took some leftover coffee from the pot and poured it into a rimmed baking sheet.  I then dipped the pages in there and let them sit for about 10 to 20 minutes as I preheated the oven to 350 degrees.


After they had been sitting in the coffee, I took them out and moved them to another pan, which I then put into the oven for about 5-10 minutes, until the paper was completely dry.  I repeated this process until all the papers had a nice aged look to them.


To make the roses, I began by cutting the paper into sets of three squares in two sizes, 3x3in and 5x5in.  I tried to make at least one large square for each song and book, to add some variety.


I then folded the squares in half and in half again, to form smaller squares.


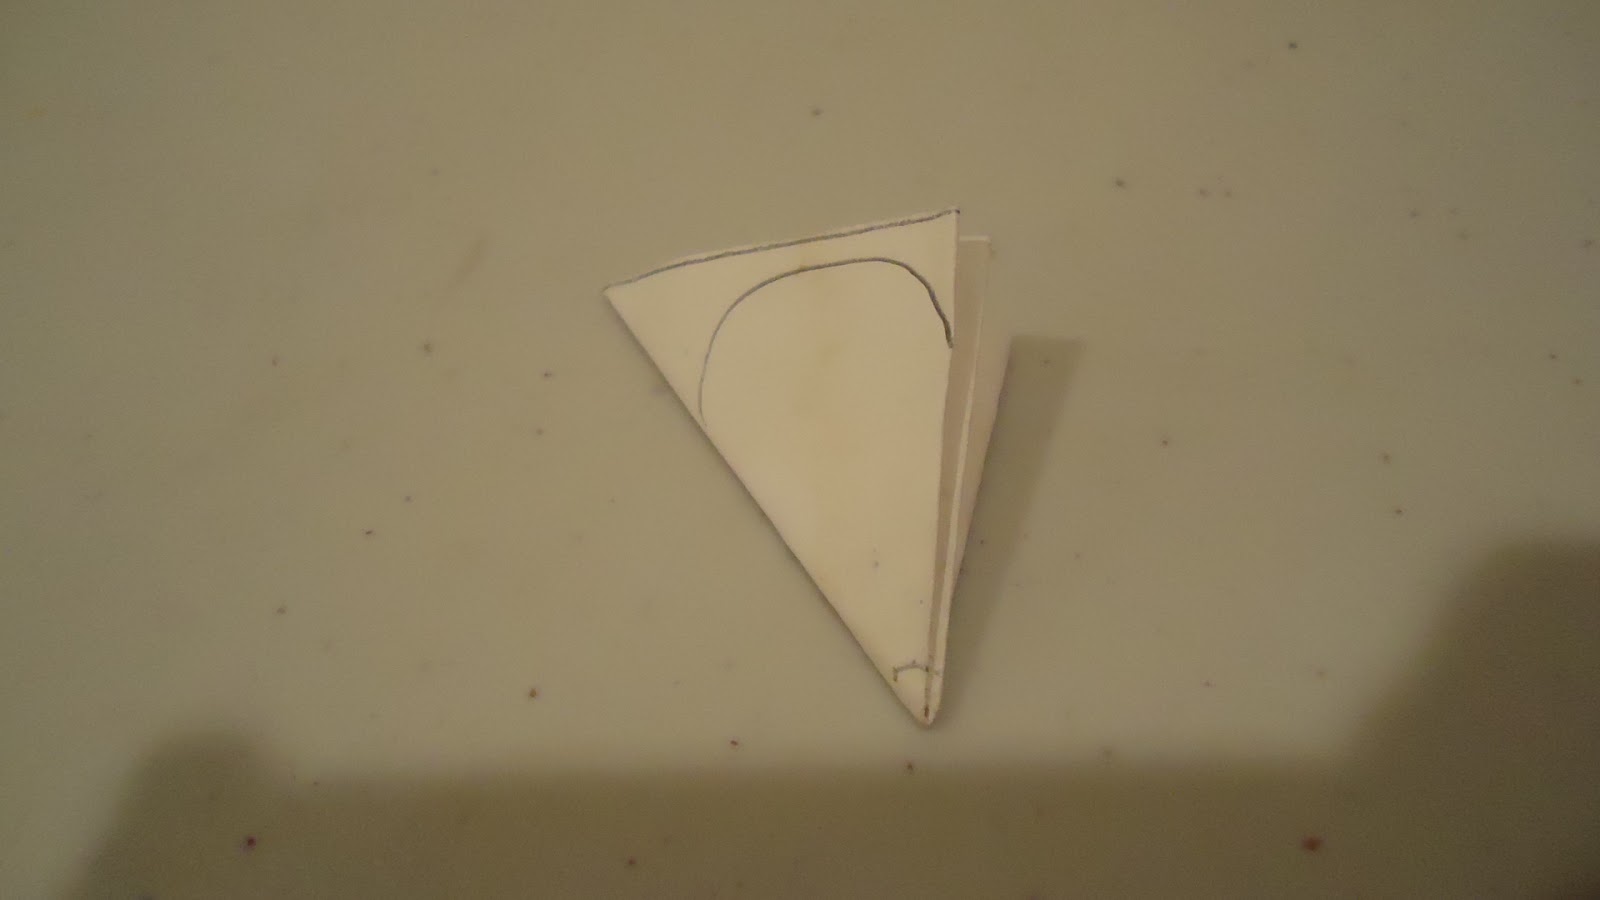
Then I folded the squares into triangles, making sure one of the corners contained only folded sections, and drew a flower petal in pencil as an outline.  Make sure to draw a line at the base of the triangle, so that there will be a hole at the center of the flower.


Once I cut and unfolded the triangles, I ended up with this:


I then cut one petal out of one flower, two out of another flower, and three out of the last flower.


I used the hot glue to glue the all the pieces with three or more petals together, and ended up with this:


Then I rolled the tips of each petal backwards, to give a more natural appearance:


After that, I rolled the one petal piece into a cylinder and glued it into the two petal piece, which I rolled into a cone.  I glued that ensemble into the three petal piece, then the four peal piece, and so on until I had all the pieces glued together.


I repeated these steps for the rest of the flowers, and glued 13" strips of wire into the bottom for the stem.


I then got some brown yarn and wrapped it around the stems until the wire was fully concealed, and used glue to secure it in place.


I collected the roses into a bouquet and tied them together to keep them securely in place.  I then placed them in the vase and filled it with the chocolates to finish off.  


I love how these roses look so real, yet they smell like coffee.  Where can you get roses that smell like coffee?  Certainly not at the store.  Needless to say, it's always better to give a gift that's sentimental to a person that to just get a gift card to Starbucks.

Tuesday, May 17, 2016

Crochet- Basket-weave Pillow


Continuing with the theme of my last post, I have made another crochet pillow.  With it's simple yet appealing basket-weave appearance, this pillow is perfect as a throw pillow for couches, benches, and beds.  This pillow is about 12'' by 12''.

For this pillow, I made one side with the basketweave pattern and the other side with just plain single crochet, but this pillow can also be made with both sides having the basketweave pattern.

Moving on to the pattern, to make this pillow you will need:


  1. Stuffing (I used polyester fiber-fill)
  2. A size I (5.5mm) crochet hook
  3. Yarn needle
  4. One ball of yarn
  5. About 2-3 weeks of time

Basketweave side:
Row 1: ch. 45
Row 2: Dc in 3rd ch from hook, dc across, ch 2, turn.
Row 3: Skipping the first dc, FPDC in next 3 Dc, *BPDC in next 4 dc, FPDC in next 4 dc* repeat from * to * across, ch 2, turn
Row 4: Skipping the first dc, BPDC in next 3 dc.  *FPDC in next 4 dc, BPDC in next 4 dc* repeat from * to * across, ch 2, turn
Row 5: Skipping the first dc, BPDC in next 3 dc.  *FPDC in next 4 dc, BPDC in next 4 dc* repeaat from * to * across, ch 2, turn
Row 6:  Skipping the first dc, FPDC in next 3 Dc, *BPDC in next 4 dc, FPDC in next 4 dc* repeat from * to * across, ch 2, turn
Row 7-end: repeat from row 3-6 until the length is about the same as the width (an easy way to test this is to fold it diagonally periodically until it forms a triangle)

Single crochet side: (If you want another basketweave side, repeat the above)
Row 1: ch. 45
Row 2: sc in each ch across, ch 1, turn
Row 3: sc in each sc across, ch 1, turn
Row 4-end: Repeat row 3 until the length is about the same as the basketweave side

Once both sides of the pillow are done, place them together, wrong sides facing out, and whipstitch them together for 3 of the sides.  Flip the pillow inside out and commence stuffing it to your liking. Once stuffed to a good amount, whipstitch the final edge together to close it off.  Tie off, weave in the ends, and you're done!

Here's a key for the abbreviations:

FPDC: Front Post Double Crochet
BPDC: Back Post Double Crochet
Dc: Double Crochet
Sc: Single Crochet
Ch: Chain

Monday, May 9, 2016

Crochet- Chevron Pillow


So I have decided to step away from the old and overused tradition of making crochet scarves and afghans and move on to pillows!  Just recently I have had an urge to flood my bedroom with throw pillows, and decided to start with this simple pattern from Red Heart.  This was a very easy and repetitive pattern, which is perfect for beginners.  The link to the pattern can be found here.  The pillow is about 30.5 x 40.5 cm, and is decorated with a modern chevron pattern.


To make this pillow, you'll need:

  1. Your favorite stuffing (I used polyester fiber-fill)
  2. Two balls of yarn, one for each color you want to use
  3. A size I (5.5mm) crochet hook
  4. About 2-3 weeks of time

I am very happy with the end result, and I love the idea that I can make the colors whatever I want to match my room scheme.